Wiring the AV-2 Cold Side Chiller Through the Hot Side Balboa Control PackUpdated a month ago
The AV-2 is shipped from the factory with the cold-side chiller powered independently through a standard GFCI-protected power cord. In some installations, customers may prefer to power the cold-side chiller directly from the hot-side Balboa control pack. This allows the Balboa system to provide power to the chiller and eliminates the need for a separate wall outlet for the cold side.
This modification should only be performed by individuals familiar with electrical wiring practices preferrably a licensed electrician. If you are not comfortable performing this procedure, contact Aquavoss Technical Support for assistance.
Required Tools & Materials
- Wire cutters
- Wire strippers
- Female insulated spade connectors
- Crimping tool
- Phillips screwdriver
- Flat head screw driver
Before You Begin
- Turn OFF all power to the AV-2 at the breaker.
- Verify power is disconnected using an appropriate testing device.
- Remove the hot-side equipment access panel.
- Locate the cold-side power cord entering the equipment compartment.
Electrical Supply Requirements
Before performing this modification, verify that the hot side of the AV-2 is connected to a properly installed 240V, 50A, GFCI-protected circuit in accordance with local electrical codes and the requirements outlined in the AV-2 Owner's Manual.
By wiring the cold-side chiller through the hot-side Balboa control pack, the chiller's electrical load will be supplied through the hot-side electrical service. As a result, it is critical that the hot-side circuit is properly sized, protected, and installed before proceeding.
Failure to provide the proper electrical service may result in equipment damage, nuisance tripping, improper operation, or potential safety hazards.
If you are unsure whether your installation meets these requirements, consult a qualified electrician before performing this modification.
Step 1: Remove the Factory GFCI Plug
The cold-side chiller is shipped with a factory-installed GFCI plug.
- Cut the GFCI plug from the end of the cold-side power cord.
- Carefully strip back the outer insulation jacket.
- Strip approximately 1/4" (6 mm) of insulation from the individual conductors.
You should now have:
- Black wire (Hot)
- White wire (Neutral)
- Green wire (Ground)
Alternate Chiller Wire Colors
After removing the factory plug and stripping the chiller power cord, verify the conductor colors before making your connections.
If your chiller power cord contains red, black, and yellow conductors, use the following connections:
Red: Power / Hot
Black: Neutral
Yellow: Ground
Continue with the wiring instructions below using these conductor designations.
Step 2: Install Female Spade Connectors
Using a crimping tool:
- Install an insulated female spade connector onto the black (hot) conductor.
- Install an insulated female spade connector onto the white (neutral) conductor.
- Confirm both connectors are securely crimped before proceeding.
Step 3: Connect the Chiller Power Wires to the Balboa Control Pack
Locate the designated hot and neutral terminals on the Balboa circuit board.
Connect:
- Black wire (Hot) → Designated chiller power output terminal
- White wire (Neutral) → Designated neutral terminal
Wiring Diagram
Reference the illustration below for the exact terminal locations on the Balboa circuit board.
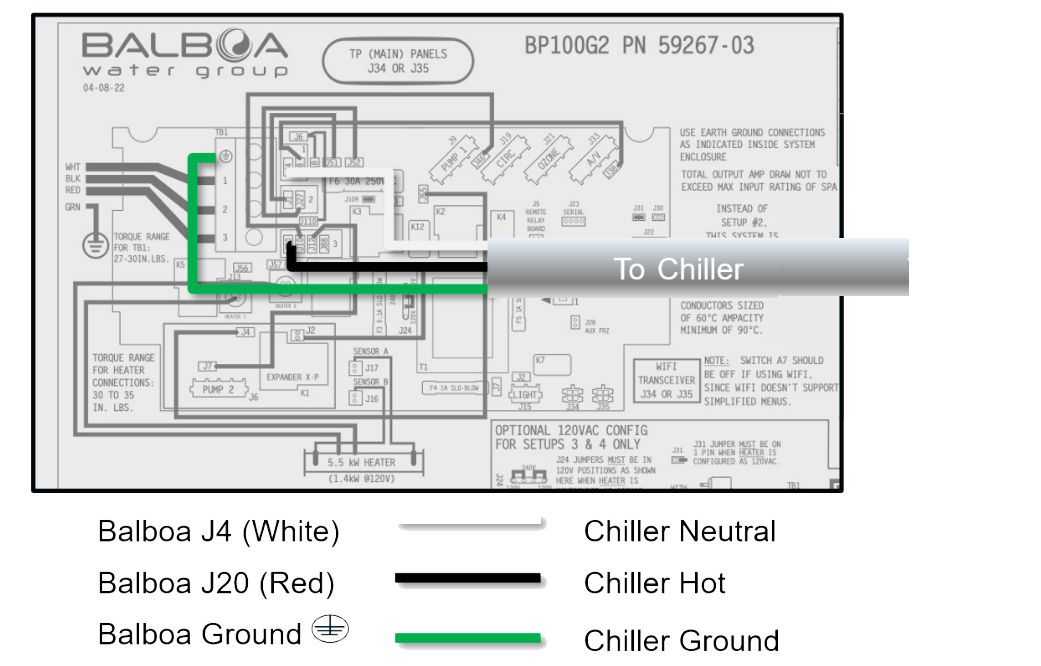
Step 4: Connect the Ground Wire
The green ground wire from the chiller must be connected to the system grounding circuit.
There are two acceptable methods:
Option 1 (Preferred)
Insert the chiller ground wire into the same grounding terminal used by the incoming service ground for the hot-side electrical supply.
Option 2
Route the ground wire through the designated grounding access hole inside the control box and connect it directly to the grounding/bonding terminal provided by Balboa.
Step 5: Verify Connections
Before restoring power:
- Confirm all spade connectors are fully seated.
- Verify hot and neutral wires are connected to the correct terminals.
- Verify the ground wire is securely fastened.
- Ensure no exposed copper conductors are visible.
- Confirm wiring is routed away from pumps, heaters, and moving components.
Step 6: Restore Power
- Reinstall any covers removed during the procedure.
- Restore power at the breaker.
- Allow the Balboa control system to boot.
- Verify the chiller powers up normally.
- Confirm both the hot side and cold side operate as expected.
Important Notes
- This modification eliminates the factory GFCI plug connection for the cold side.
- The cold-side chiller will now receive power through the hot-side Balboa control system.
- All wiring must comply with local electrical codes.
- If you are uncertain about any portion of this procedure, contact Aquavoss Technical Support before proceeding.
For additional assistance, please contact Aquavoss Technical Support with photos of your installation.