How to Drain the Aquavoss AV-2 (Hot & Cold Sides)Updated 3 months ago
1. Turn Off All Power to the Unit
Before draining either side of your AV-2, completely shut off power to the unit.
Locate the breaker panel and turn off:
• The 50amp breaker for the hot tub
• Unplug the 110V outlet or turn breaker for the chiller off (cold plunge side)
Important: Never attempt to drain the unit while power is on. Running pumps without water can cause damage to seals, pumps, heaters, or the chiller.
2. Remove the Access Cabinet
The technology for both the cold plunge and hot tub is located inside the “equipment compartment.”
The equipment compartment can be identified in three ways:
- It is on the same side as the thicker portion of the acrylic shell.
b. It has the larger vent on the exterior cabinet.
c. There is a black handle at the bottom center of the panel.
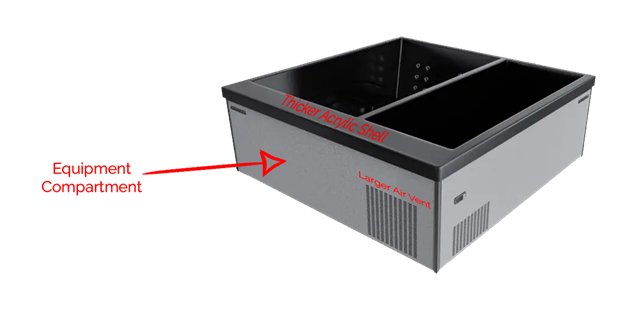
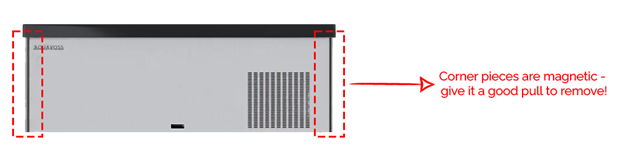
Remove the two corner trim pieces by gently pulling them away from the unit.
Once removed, use the provided Allen wrench to remove the exposed screws on each corner.
3. Locate the Drain Valves
Inside the equipment compartment, you will find dedicated drain valves for:
• The hot tub side
• The cold plunge side
Each side drains independently.
Attach a standard garden hose to the drain fitting for the side you wish to drain.
Run the hose to an appropriate drainage location.
4. Open the Drain Valve
Water will begin flowing through the attached hose.
Allow the tank to drain completely.
Tip: For faster draining, remove the filter cap on the respective side to allow air into the system.
5. Assist the Final Drainage (If Needed)
Depending on your installation and surface level, a small amount of water may remain in the footwell.
If desired, you may:
• Use a wet/dry vacuum
• Towel dry the remaining water
Do not attempt to run pumps to “push” remaining water out.
6. Close the Drain Valve
Once fully drained:
Close the drain valve
Remove the garden hose.
Ensure the valve is fully seated and secure before refilling the unit.
7. Reinstall the Access Cabinet
Reattach the cabinet panel by aligning it with the magnetic frame.
Reinstall the corner trim pieces.
Again, screws are optional after first removal.
8. Refilling the Unit
When ready to refill:
• Ensure drain valves are fully closed
• Fill each side independently
• Fill water at least .5–1 inches above the highest jet
• Do NOT restore power until water is above all jets
Running pumps, heaters, or the chiller without proper water level can cause serious system damage.
🎥 Instructional Video
Below is a full walkthrough showing how to drain both the hot and cold sides of your Aquavoss AV-2:
If you have any questions about draining or refilling your Aquavoss AV-2, please don’t hesitate to contact our Technical Service Team. We’re happy to help.